Application
Inżynieria odwrotna
W dzisiejszych, szybko rozwijających się czasach, wszystkie dziedziny życia, takie jak przemysł elektroniczny, infrastruktura, Internet i przemysł samochodowy wykazują swoją żywotność. Nowa technologia energetyczna staje się coraz bardziej popularna po erze pary i technologii silników spalinowych. Wsparcie pomiarowe 3D jest niezbędną częścią przemysłu motoryzacyjnego, pozwalającą osiągnąć jakość i rozwiązać problemy techniczne.
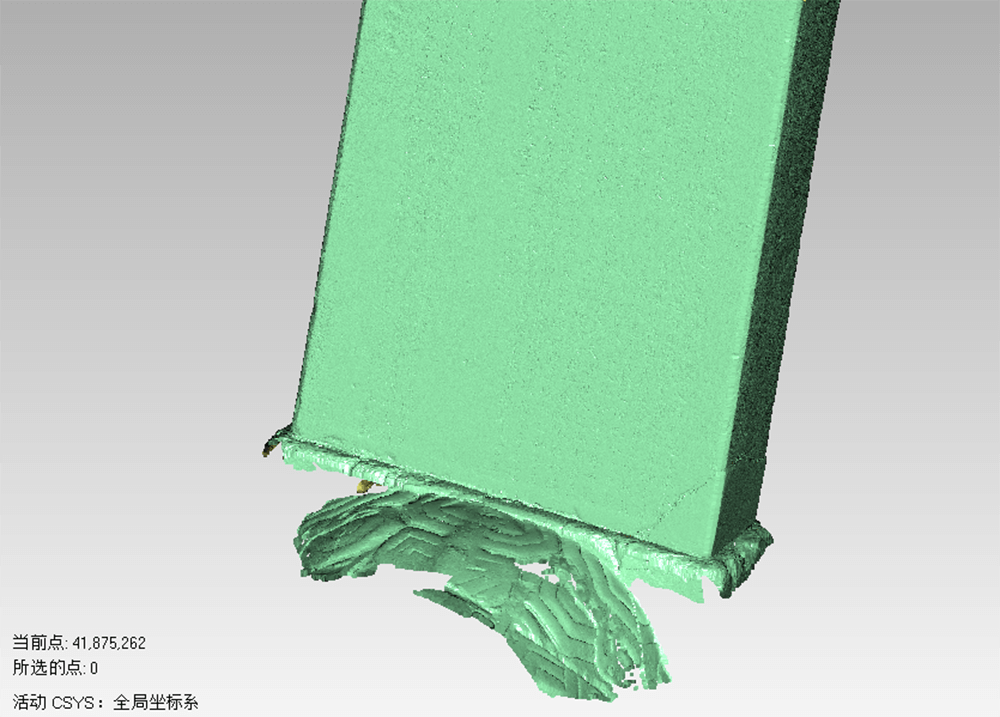
Na ilustracji przedstawiono tylną oś pojazdu. W celu zapewnienia odpowiedniej jakości przed rozpoczęciem produkcji zostaną przeprowadzone szeroko zakrojone eksperymenty . Na przykład, w samochodzie z przebiegiem stu tysięcy kilometrów wykryto nieznacznie zniekształcenia w tylnej części osi. Nasze pomiary były niezbędne dla uzyskania danych umożliwiających poprawę.
Sprawdzamy miejsce wypadku, odnajdujemy deformację i sporządzamy dokumentację fotograficzną.
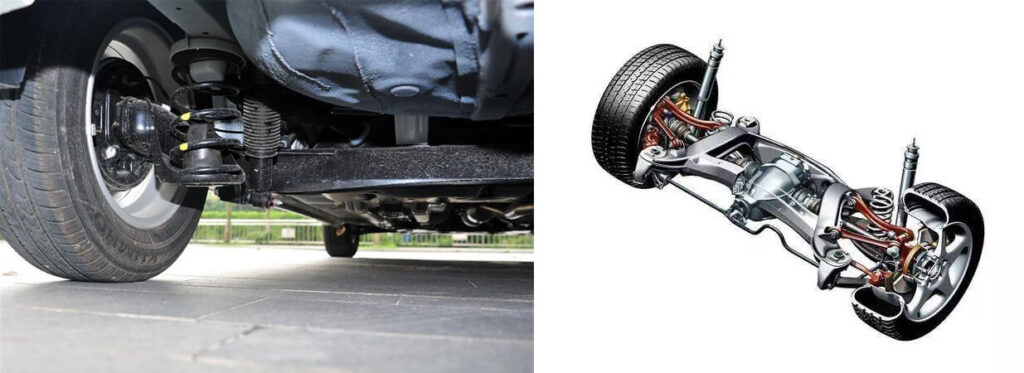
2. Za pomocą instrumentu pomiarowego PMT 3D zbieramy odpowiednie dane do analizy deformacji. Kolorowe zdjęcie zostanie wysłane do naszego klienta w celu optymalizacji wyników analizy. W przeszłości, czujnik był używany do pomiaru lub demontażu uszkodzonych części do laboratorium. Jednak te działania nie mogą zapewnić precyzji lub okres pomiaru.
3. Rysunek 3D zostanie wysłany do naszych klientów po analizie danych.
Prototype Fit Analysis
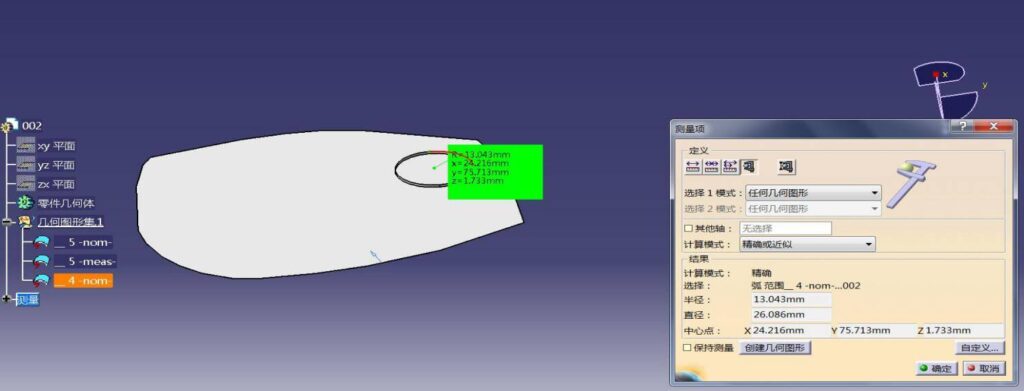
In the development of modern transportation and industrial automation, the production of various parts of different sizes totally depends on the support of high-tech inspection instruments. PMTARMS provide high-precision, high-efficiency and very portable measurement solutions. The figure shows the inspection gauge of the automatic production line. PMTARMS present perfectly the difference of processing and assembling.
1. The finished vehicle mould. Due to various uncertain factors in the processing and assembling, there is a certain deviation between the finished product and the design
2. Customers can propose the improvement program according to the report where PMTARMS showing the deviation location and quantities in real time with prototype analysis solution.
It used to take a day to measure components with traditional caliper or angle gauge and sometimes it was inaccuracy. But now, it can be shortened into one hour to measure numerous mounting holes of each part with analyzing data which is impossible in the past.
3. We offer the report with final data to customers as a reference.
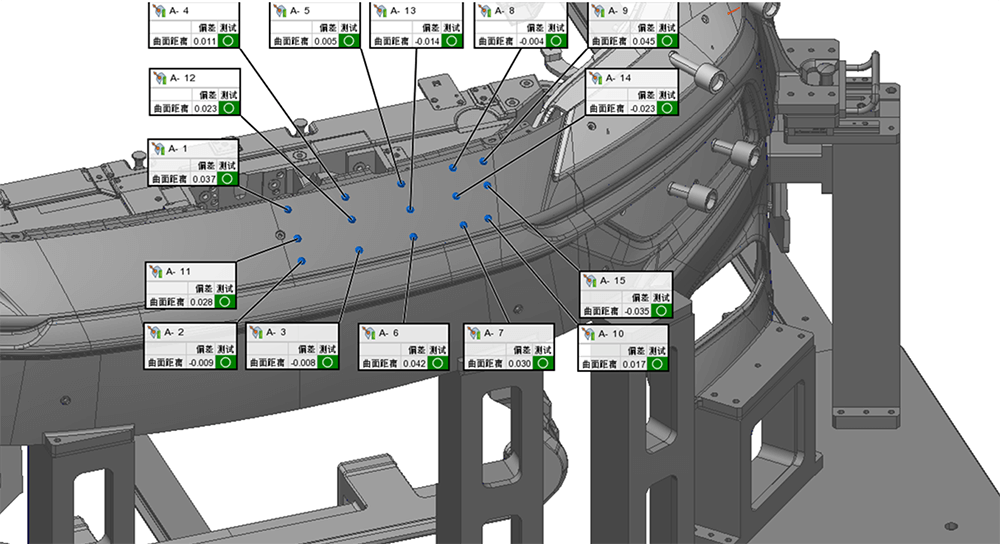
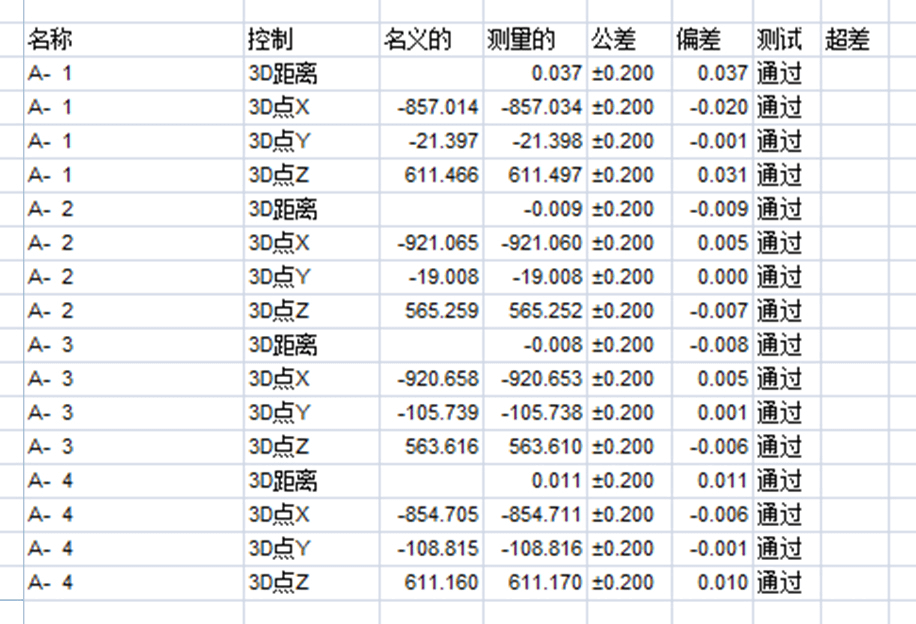
4. Export measurement data in general mathematical mode format based on customer’s requirements.
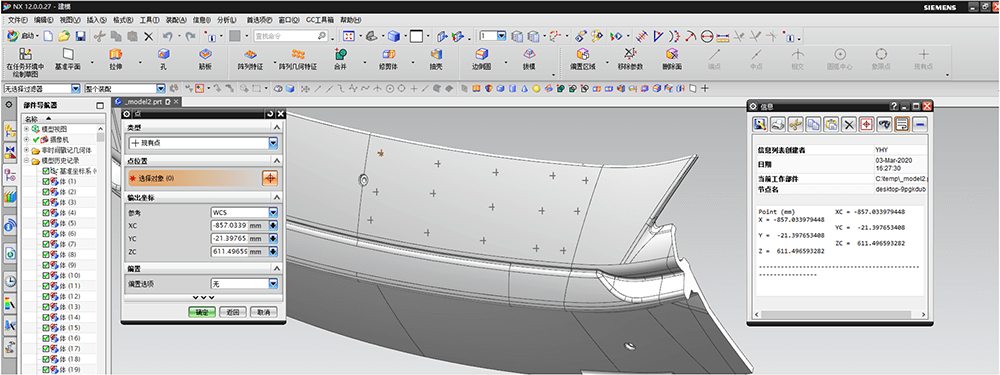
Conclusion: advantages of PMTARMS in the inspection: 1. High-accuracy 2. Portable 3. High-Efficiency 4. Applied to all kinds of complicated parts 5. Present the deviation location and quantities in real time 6. Analysis report of visible pictures 7. Editable report 8. Provide general prototype format for designers’ reprocessing in various 3D drawing software.
Real-time Verification
Manufacturing industry plays an important role in the rapid progress of society, and quality is the permanent topic. Because of the low efficiency and high cost, the production quality couldn’t be guaranteed in the past. Then tools exist to change this situation, but how to meet the needs of designing?The coordinate measure machines can calibrate the tooling to the ideal position in advance, which not only satisfies the production efficiency but also improves the quality and reduces the rejection rate to ease the burden for the enterprise. But how to ensure the consistency of products through its mass production?The portable 3D measuring machine of PMT offers a good solution to this question. In the following we will introduce the application in the field of industry.
Case:
PMT portable coordinate measure machine shows powerful advantage in dealing with the complex industrial parts with its own flexibility and high precision. In 2019, it suddenly happened that the machinery wasn’t connecting with the baseplate in the welding production line of one automobile manufacturer. In this emergency, it only cost 30 minutes of our engineer to find the reason with PMT portable machine and one hour to fix which caused by the tightening in advance of one clamping device on a location pin. After maintenance, the manager said: You’re great. It should take 2-3hours by 3-5 engineers to fix this problem and you guys only took one hour. Excellent!
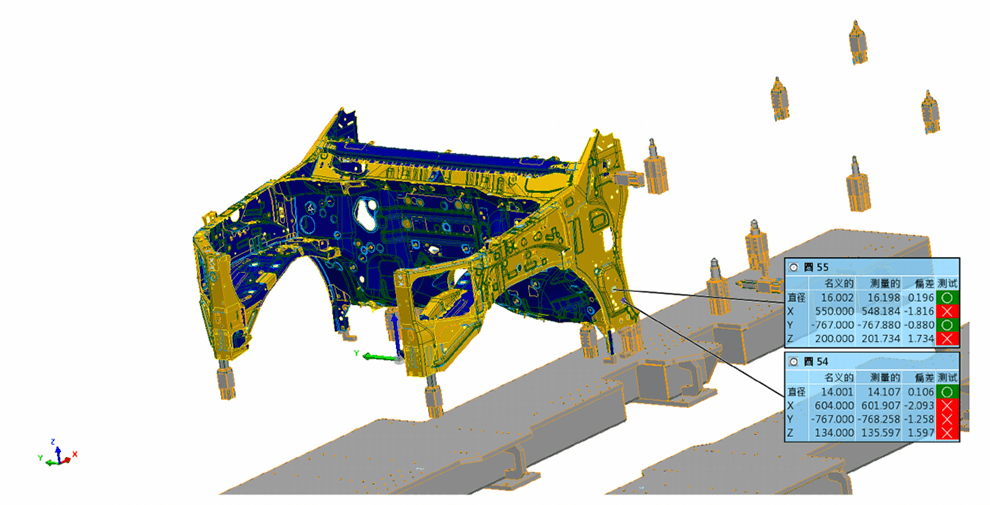
Real-time Inspection Overview:
1. PMT can be used to do quick inspection for some large and complex products with corresponding measurement plan according to the production schedule to ensure the production quality.
2. Real time inspection is necessary in order not to impact the production. The test data is saved and the output report is available for the engineer to analyze and modify the production line.
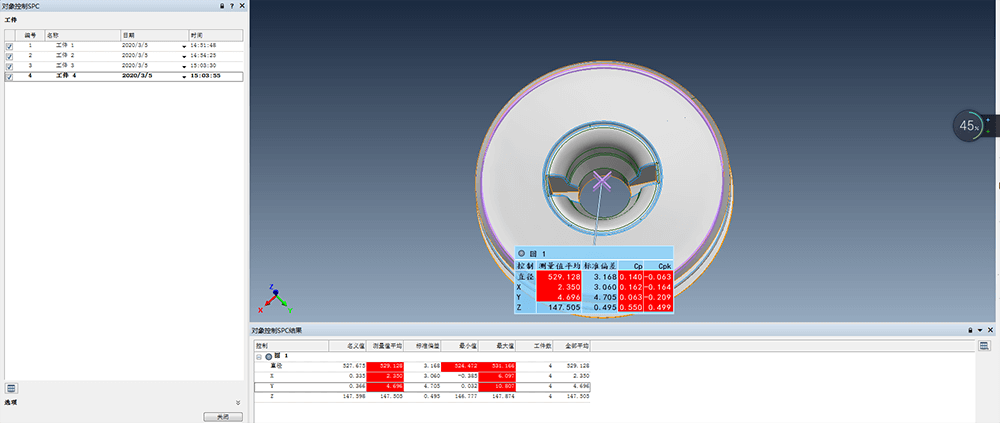
3. Conclusion: PMT has powerful advantages in dealing with medium, large and complex components with its characteristics of high precision, flexibility, no environment limitations, portability and wide application. For real time inspection, we can also complete the data collection at fastest speed and the most accurate data within the shortest time.
Incoming Inspection
Incoming inspection refers to the inspection for raw materials, components or products and quality confirmation by sampling method, and then to confirm whether the products are acceptable or rejected.
In the manufacturing industry, the four major items that have a direct impact on product quality are usually design, incoming materials, processing, storage. Generally, the design part accounts for 25%, incoming materials 50%, processing 20%, and storage1% to 5%.
In summary, incoming inspection plays an overwhelming role in the production control which needs to be taken as a strategy of the company.
However, there are often some deviations in the measurement by common detection tools, like distance between holes, depth of parallelism, perpendicularity and angle.
PMTARMS can not only reduce the number of measurement tools and time, but also greatly improve the accuracy.
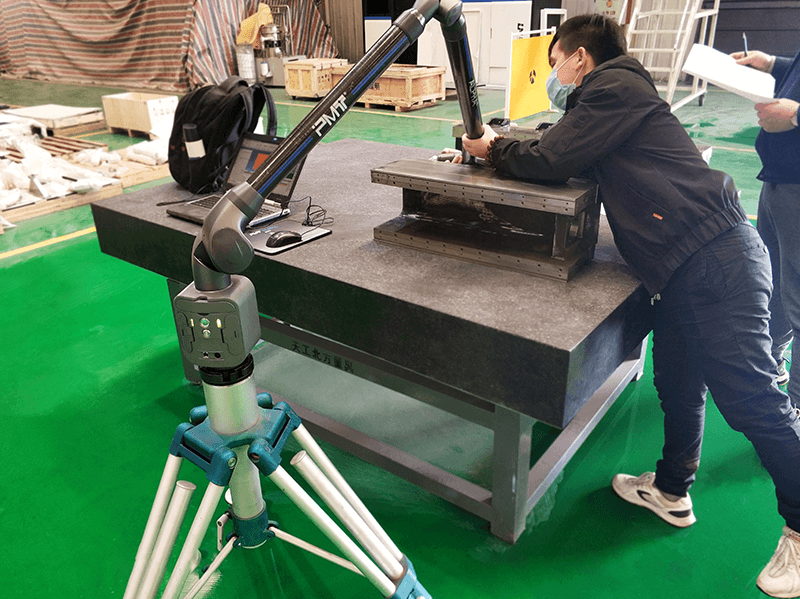
As shown in the figure, it’s difficult to detect the parts with a number of sizes used the common tools, but PMT can do it and create reports immediately.
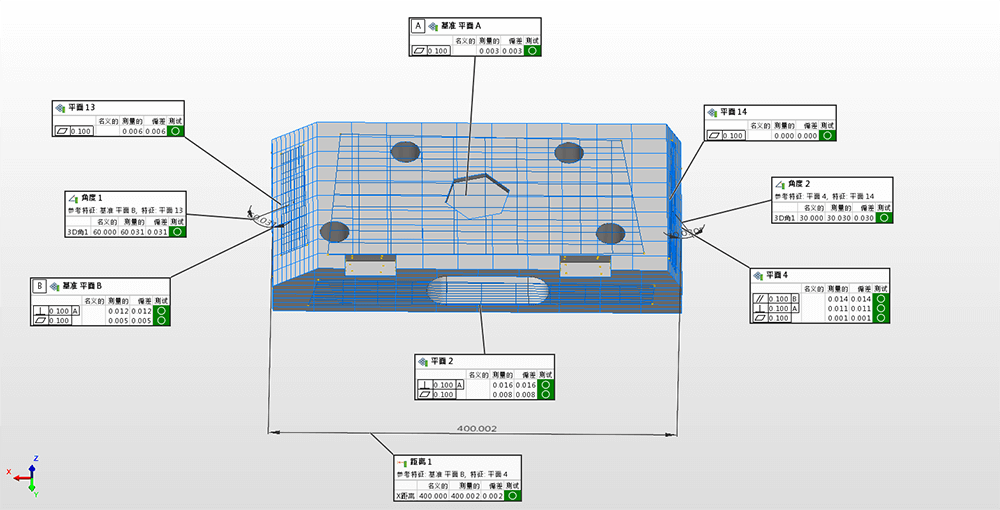
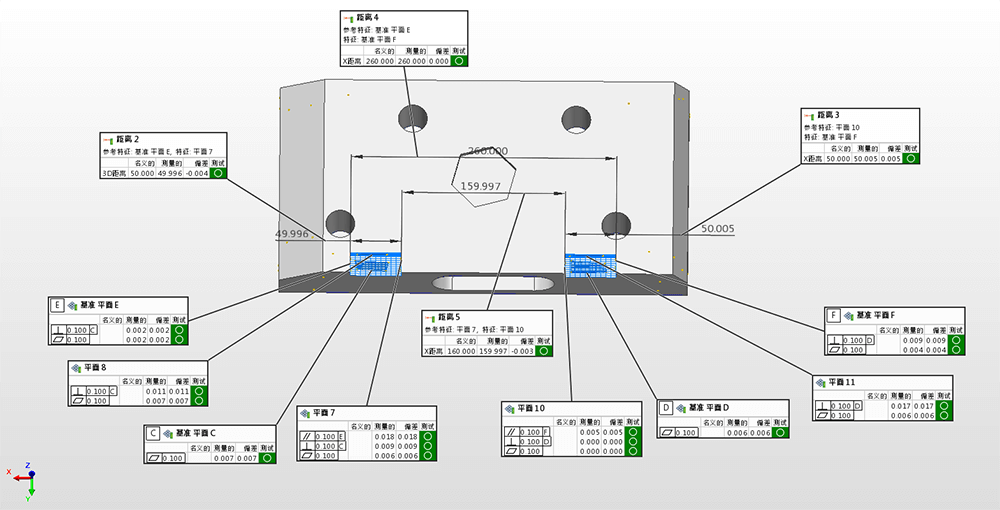
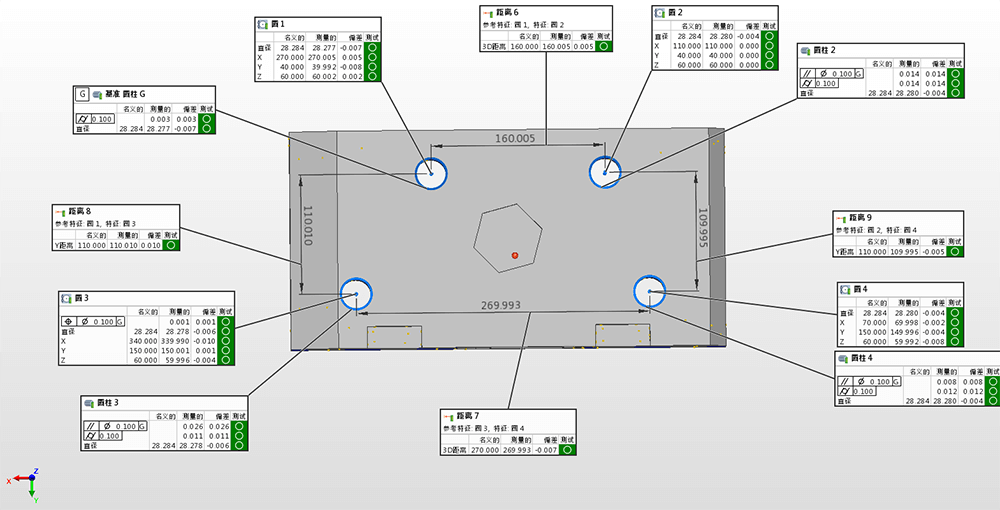
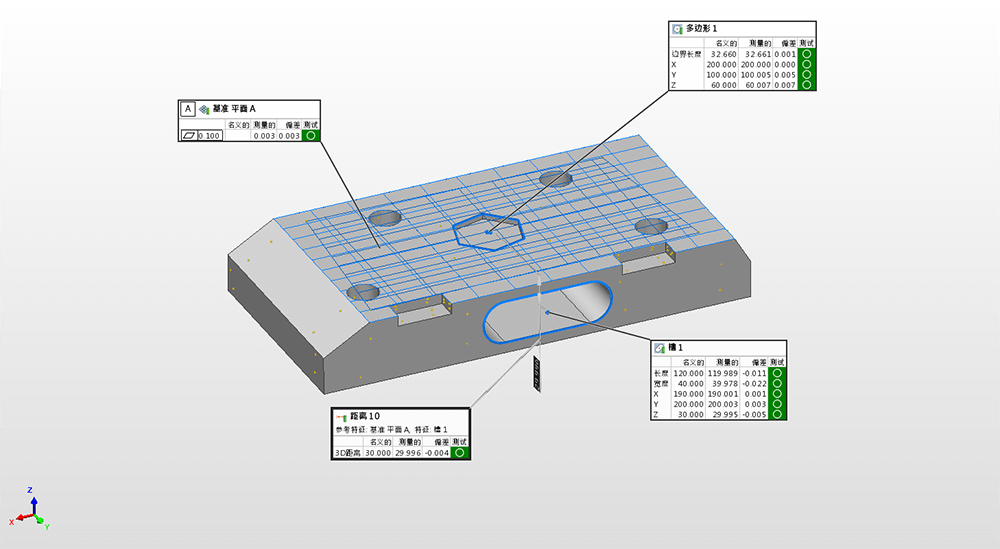
Except for above sizes, some other basic GD&T such as profile tolerance, roundness, symmetry and some features such as ellipse or sphere can also be measured by PMTARMS.
G&RR Dimensional Analysis G&RR
For processing enterprises, the quality of the product ensures the highest standard of customer reputation. And the valid data guarantees the effective inspection, size controlling and normal production by dimensional analysis G&RR which is used at first time of the machine starting and the maintenance once a year.
Shown as the picture is some samples need analysis from G&RR.

1. 3 engineers and 10 times inspections each person are needed to detect 3 components. We used one PMTARM with accuracy range from 0.01 to 0.015. According to customer’s requirements, the measuring equipment should be one level accurate higher than the measured object, for example, if the accuracy for the measured object is 0.1, our equipment would be 0.01while ours 0.01-0.02 for the measured object 0.15.
2. First, we number all parts in advance and identify the measuring point which is usually the inner hole diameter by default with a design standard of 100MM +0/-0.15. Then one engineer takes the first measurement in a random way and fills the data in the form. After that another two engineers do it in the same way. Repeat the above steps to have 10 consecutive times measurement as follows.

3. After receiving the data, we analyze it through G&RR to confirm whether the process reaches the standard or not as follows.
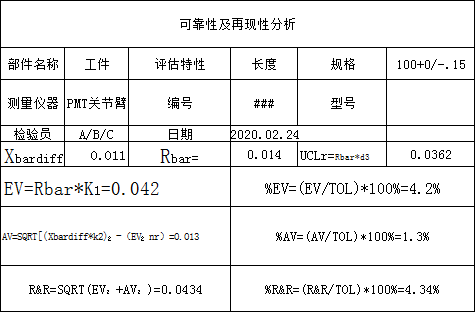
4. Our criterion: the system is in the normal operation if the tolerance is less than 10%; the system is acceptable if the tolerance is between 10%-20%; the system needs to be improved if it’s between 20%-30%; the system is unacceptable and should be adjusted if it’s larger than 30%.
Conclusion: we got the result Gage R&R=4.34%<20% which meant the system was qualified to be continuous used. This test perfectly proved that the PMT equipment and the manufacturing process can pass the verification by high standard. In addition, PMT measurement data can successfully meet customer’s standard, and even exceed their ideal value, which promises a mass production in the future for them.
Digital Solution for Temple Inscriptions
Background:
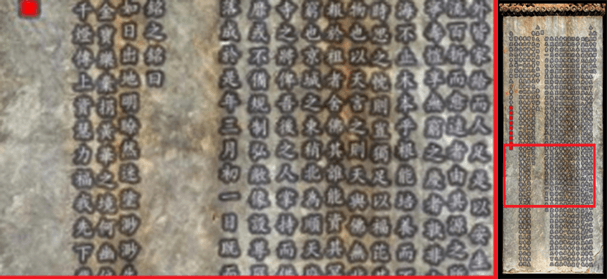
As shown in the picture, the temple has a history of more than 500 years built in 1444. The inscription has suffered erosion, and the handwriting has been slightly blurred after wind and rain. It’s urgent to digitize and archive the cultural relics to protect the appearance and possible future restoration. Therefore, a high-tech solution is needed to sample the current cultural relics.

Sampling Plan:
Use non-contact scanning technology to collect original cloud points and restore current scene by photographic mapping technique.
The picture below shows the PMTARM is using laser scanning technique to collect the original cloud points of the antique.
The picture shows below is the comparison of characters after cloud details and photographic mapping.

The Value Creation:
It’s especially outstanding to capture the details of cultural relics with PMTARMS combined with laser scanning technique which safeguards the subsequent protection work for its high accuracy within 0.1mm without touching them.
Tool Verification
With the rapid development of the automobile industry, customers pay more attention on the safety, power performance and body shape, and all the demands are down to the strict quality requirements for stamping, welding, final assembly and coating.
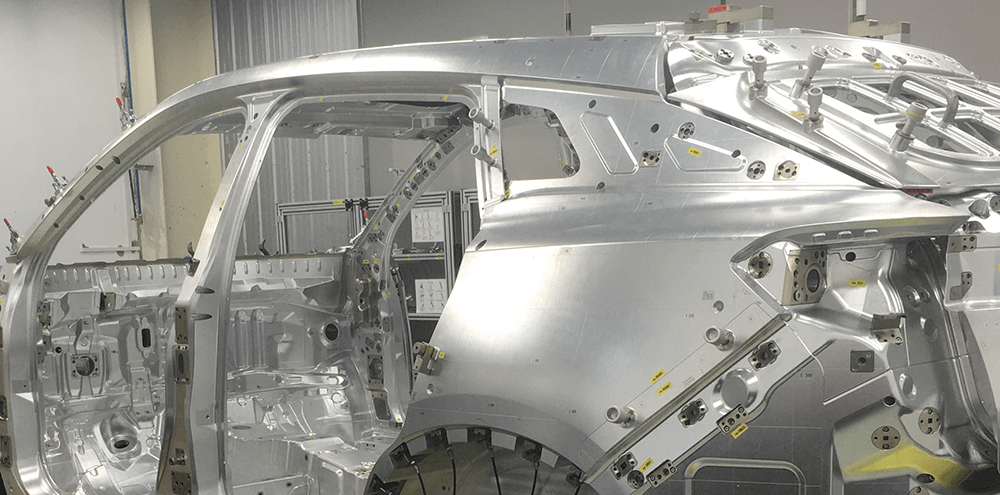
Because of the high quality control requirements of the factory and the non-standard tooling of the production line, there are extremely strict parameter requirements for the precision control and quality inspection of each component during assembly. Portable measuring equipment has been used for quality control of automobile production line, including welding fixture inspection, production line quality control, etc. The automobile welding production line means to assemble all the stamping parts and then weld to the formers including the production line of engine parts, side body, car floor and roof.
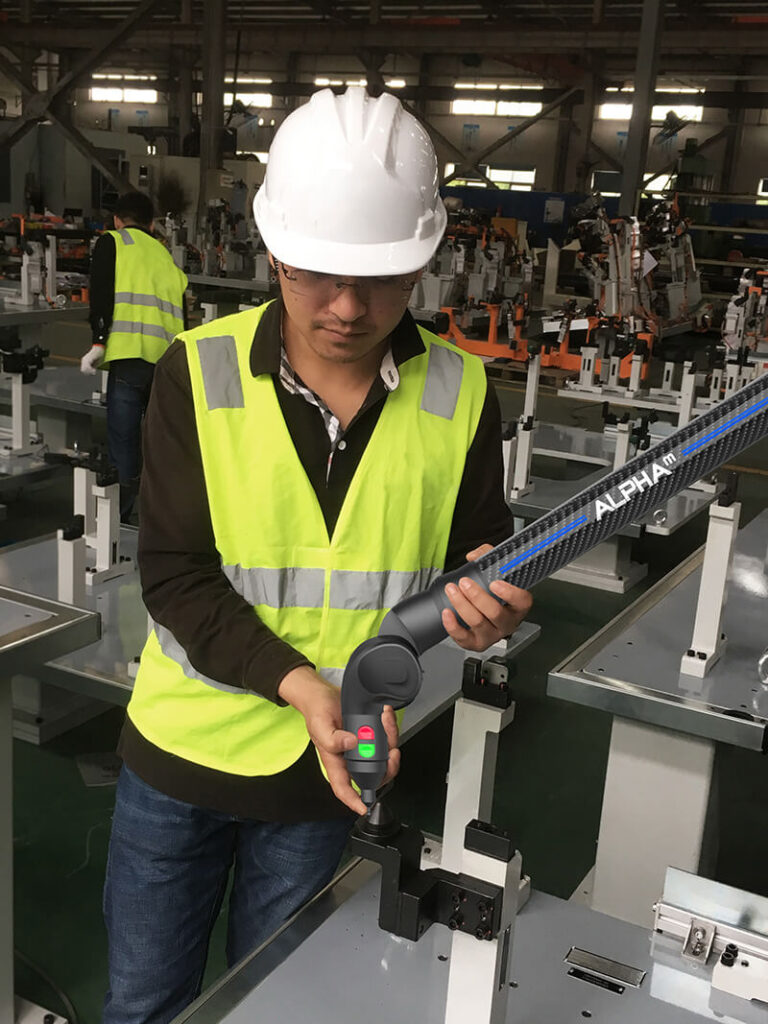
The engineer is inspecting the tooling with PMTARM
According to the different needs of customers, portable measuring equipment can easily complete the point-to-point contact measurement as well as measurement task for all angles. The extremely flexible measuring arm enables customers to complete multi-stage and complex detection tasks. Magnetic mount can be installed in any workshop to establish basic data of location hole and locating surface. Besides, PMTARMS fully meet the measurement requirements of accuracy within 0.1mm for positioning fixture while the accuracy within 0.2mm for the auxiliary positioning fixture. The caliper, height gauge are the common tools before the use of measuring arm. The disadvantages of those kind of manual measurement methods are not only waste time, cannot meet the accuracy requirement, but also cause human errors. It’s impossible to measure even more complex parts.
There are three periods for the PMTARMS applied in the production. Firstly, parts measurement before assembling. It is necessary to detect the tolerance of precision and hole distance to ensure the assembly process will not be affected by the defects of the tooling itself. Secondly, inspection of equipment integration. When the equipment is integrated, the location accuracy is needed to be detected including the welding fixture and the whole production line. The quality control of finished products is helpful to keep consistent with data from location points and model parameter to avoid the influence of welding accuracy caused by equipment. Thirdly, measurement at customer site. Before welding we will assist customer to adjust deviation values between finished products and models.
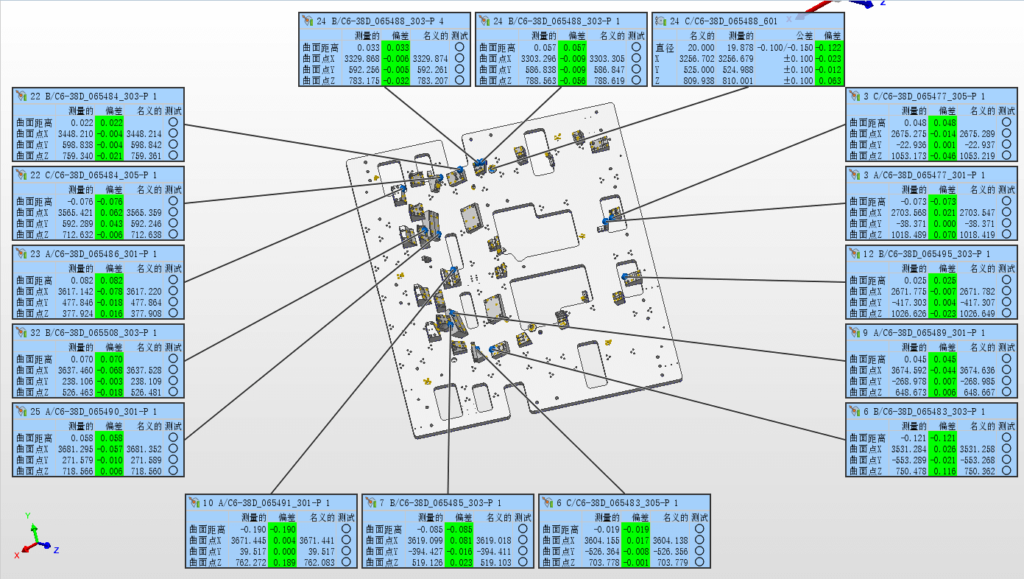
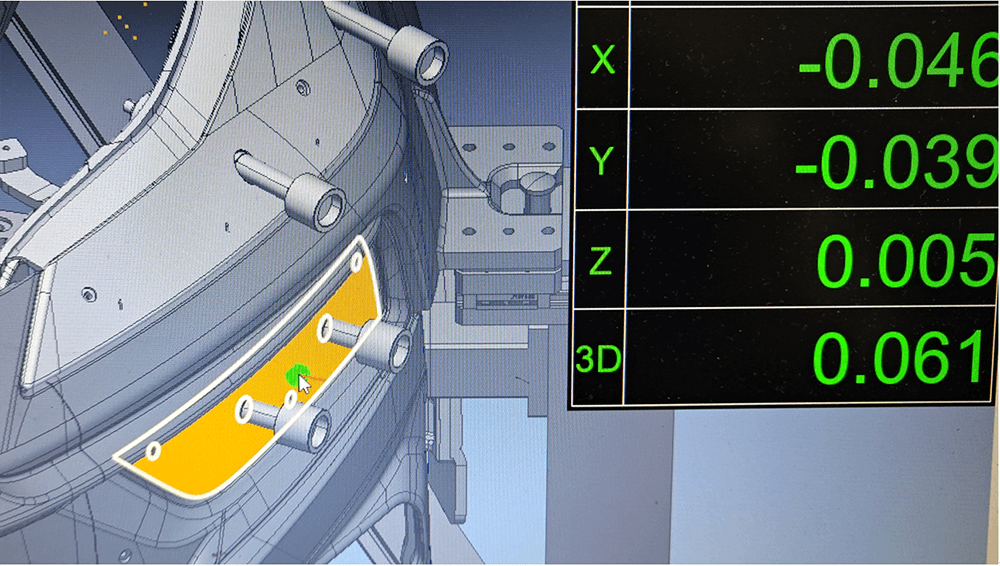
Measurement report shows as below.
Tool Verification
With the rapid development of the automobile industry, customers pay more attention on the safety, power performance and body shape, and all the demands are down to the strict quality requirements for stamping, welding, final assembly and coating.
Because of the high quality control requirements of the factory and the non-standard tooling of the production line, there are extremely strict parameter requirements for the precision control and quality inspection of each component during assembly. Portable measuring equipment has been used for quality control of automobile production line, including welding fixture inspection, production line quality control, etc. The automobile welding production line means to assemble all the stamping parts and then weld to the formers including the production line of engine parts, side body, car floor and roof.

The engineer is inspecting the tooling with PMTARM
According to the different needs of customers, portable measuring equipment can easily complete the point-to-point contact measurement as well as measurement task for all angles. The extremely flexible measuring arm enables customers to complete multi-stage and complex detection tasks. Magnetic mount can be installed in any workshop to establish basic data of location hole and locating surface. Besides, PMTARMS fully meet the measurement requirements of accuracy within 0.1mm for positioning fixture while the accuracy within 0.2mm for the auxiliary positioning fixture. The caliper, height gauge are the common tools before the use of measuring arm. The disadvantages of those kind of manual measurement methods are not only waste time, cannot meet the accuracy requirement, but also cause human errors. It’s impossible to measure even more complex parts.
There are three periods for the PMTARMS applied in the production. Firstly, parts measurement before assembling. It is necessary to detect the tolerance of precision and hole distance to ensure the assembly process will not be affected by the defects of the tooling itself. Secondly, inspection of equipment integration. When the equipment is integrated, the location accuracy is needed to be detected including the welding fixture and the whole production line. The quality control of finished products is helpful to keep consistent with data from location points and model parameter to avoid the influence of welding accuracy caused by equipment. Thirdly, measurement at customer site. Before welding we will assist customer to adjust deviation values between finished products and models.

Measurement report shows as below.
